External Application Interaction
A common scenario is to have a separate workflow server that handles the orchestration of tasks, and a separate application that is responsible for executing these tasks.
To see how this works, we will create two ASP.NET Core Web applications that communicate with each other using webhooks:
ElsaServer: an ASP.NET Core Web application scaffolded from this guide.
Onboarding: another ASP.NET Core Web Application that exposes a webhook endpoint to receive events from the workflow server and provides UI to the user to view and complete tasks.
Together, the two applications implement an employee onboarding process. The role of the workflow server is to orchestrate the process, while the onboarding app is responsible for executing individual tasks requested by the workflow server to execute. The workflow server will leverage the RunTask activity to request tasks to be executed by the Onboarding app.
These tasks will be completed by a human user. As a task is marked as completed, a signal in the form of an HTTP request is sent back to the workflow server, which then proceeds to the next step in the process.
Before you start
For this guide, we will need the following:
An Elsa Server project
An Elsa Studio instance
docker pull elsaworkflows/elsa-studio-v3:latest docker run -t -i -e ASPNETCORE_ENVIRONMENT='Development' -e HTTP_PORTS=8080 -e ELSASERVER__URL=https://localhost:5001/elsa/api -p 14000:8080 elsaworkflows/elsa-studio-v3:latest
Please return here when you are ready.
Elsa Server
Now that we have a basic Elsa Server project, we will configure it with the ability to send webhook events.
Configuring Webhooks
For that, we will install the Elsa.Webhooks package.
Add the following package to ElsaServer.csproj:
dotnet add package Elsa.WebhooksTo enable webhooks, update Program.cs by adding the following code to the Elsa builder delegate:
elsa.UseWebhooks(webhooks => { webhooks.WebhookOptions = options => { builder.Configuration.GetSection("Webhooks").Bind(options); }; });This will add webhook definitions from appsettings.json, which we configure next:
Update appsettings.json by adding the following section:
{ "Webhooks": { "Endpoints": [ { "EventTypes": [ "RunTask" ], "Url": "https://localhost:5002/api/webhooks/run-task" } ] } }With this setup, the workflow server will invoke the configured URL everytime the RunTask activity executes.
Create the Workflow
We will create the following workflow using Elsa Studio:
We will create the workflow using C# in the Elsa Server project.
Designing the Workflow
Start the workflow server application and the Elsa Studio container connected to the server.
To create the workflow, follow these steps:
New Workflow
From the main menu, select and click the Create Workflow button.
Enter
Employee Onboardingin the Name field.Click OK to create the workflow.
Add Variable: Employee
When we execute the workflow later on, we will be sending along information about the employee to onboard.
To capture this employee input, we will store it in a variable called
Employee.From the tab, create a new variable called Employee of type Object.
Ad Activity: Set Employee from Input
From the Activity Picker, drag and drop the Set Variable activity on the design surface and configure its input fields as follows:
Field
Value
Variable
Employee
Value
getInput("Employee")return Input.Get("Employee");Add Activity: Create Email Account
Now it is time to create an email account for the new employee.
The workflow server itself will not perform this task; instead, it will send a webhook event to the Onboarding application that we will create later on.
To send this webhook event, we leverage the Run Task activity.
Add the Run Task activity to the design surface and configure it as follows:
Field
Value
Task Name
Create Email Account
Payload
return { employee: getEmployee(), description: "Create an email account for the new employee." }return new { Employee = Variables.Employee, Description = "Create an email account for the new employee." };Add Activity: Create Slack Account
Now that the email account has been setup for the new employee, it is time to setup their Slack account.
Just like the Create Email Account task, the workflow should send a webhook event to the Onboarding application using another Run Task activity.
Add the Run Task activity to the design surface and configure it as follows:
Field
Value
Task Name
Create Slack Account
Payload
return { employee: getEmployee(), description: "Create a Slack account for the new employee." }return new { Employee = Variables.Employee, Description = "Create a Slack account for the new employee." };Add Activity: Create GitHub Account
At the same time that the Slack account is being created, the Onboarding app should be able to go ahead and create a GitHub account at the same time.
Here, too, the workflow should send a webhook event to the Onboarding application using another Run Task activity.
Add another Run Task activity to the design surface and configure it as follows:
Field
Value
Task Name
Create GitHub Account
Payload
return { employee: getEmployee(), description: "Create a GitHub account for the new employee." }return new { Employee = Variables.Employee, Description = "Create a GitHub account for the new employee." };Add Activity: Add to HR System
While a Slack account and a GitHub account are being provisioned for the new employee, they should be added to the HR system.
As you might have guessed, the workflow should send a webhook event to the Onboarding application using another Run Task activity.
Add another Run Task activity to the design surface and configure it as follows:
Field
Value
Task Name
Add to HR System
Payload
return { employee: getEmployee(), description: "Add the new employee to the HR system." }return new { Employee = Variables.Employee, Description = "Add the new employee to the HR system." };Add Activity: End
Although this step is optional, it is never a bad idea to be explicit and signify the end of the workflow.
Which is the purpose of the End activity. It doesn't contain any logic and is purely a marker activity.
Go ahead and add an End activity to the design surface. No configuration necessary.
Connect
Now that we have all the pieces on the board, let's connect them together as shown in the above visual.
Publish
Before we can invoke the workflow, we need to publish our changes by clicking the button.
Coding the Workflow
To create the Onboarding workflow, follow these steps:
Create Onboarding workflow class
Create a new class called
Onboarding:Workflows/Onboarding.cs
using Elsa.Extensions; using Elsa.Workflows; using Elsa.Workflows.Activities; using Elsa.Workflows.Contracts; using Elsa.Workflows.Runtime.Activities; using Parallel = Elsa.Workflows.Activities.Parallel; namespace ElsaServer.Workflows; public class Onboarding : WorkflowBase { protected override void Build(IWorkflowBuilder builder) { var employee = builder.WithVariable<object>(); builder.Root = new Sequence { Activities = { new SetVariable { Variable = employee, Value = new(context => context.GetInput("Employee")) }, new RunTask("Create Email Account") { Payload = new(context => new Dictionary<string, object> { ["Employee"] = employee.Get(context)!, ["Description"] = "Create an email account for the new employee." }) }, new Parallel { Activities = { new RunTask("Create Slack Account") { Payload = new(context => new Dictionary<string, object> { ["Employee"] = employee.Get(context)!, ["Description"] = "Create a Slack account for the new employee." }) }, new RunTask("Create GitHub Account") { Payload = new(context => new Dictionary<string, object> { ["Employee"] = employee.Get(context)!, ["Description"] = "Create a GitHub account for the new employee." }) }, new RunTask("Add to HR System") { Payload = new(context => new Dictionary<string, object> { ["Employee"] = employee.Get(context)!, ["Description"] = "Add the new employee to the HR system." }) } } }, new End() } }; } }
The above workflow will be registered with the workflow engine automatically since the Elsa Server is configured to find all workflows in the same assembly of the Program class.
With that in place, let's create the Onboarding application next.
Onboarding Application
To create the Onboarding application, we will create a new project based on the MVC Web Application template.
The purpose of this application is to receive webhook events from the workflow server and create Task records in the database.
The UI of the application will display a list of these tasks and allow the user to click a Complete button.
Upon clicking this button, the application will send an HTTP request to the workflow server to resume the Onboarding workflow.

Follow these steps to create the Onboarding application:
Create Project
Run the following command to generate a new MVC Application:
dotnet new mvc -o Onboarding -f net8.0Add Packages
Navigate into the project directory:
cd OnboardingThen add the following packages:
dotnet add package Microsoft.EntityFrameworkCore dotnet add package Microsoft.EntityFrameworkCore.Sqlite dotnet add package Microsoft.EntityFrameworkCore.Design dotnet add package Microsoft.EntityFrameworkCore.Sqlite.Design dotnet add package Elsa.EntityFrameworkCoreEntity: OnboardingTask
For this application, we'll use Entity Framework Core to store the onboarding tasks in a SQLite database. First, let's model the onboarding task by creating a new class called `OnboardingTask`:
Entities/OnboardingTask.cs
OnboardingDbContext
Next, let's create the database context:
Data/OnboardingDbContext.cs
Program.cs
Update Program.cs to register the DB context with DI:
Program.cs
builder.Services.AddDbContextFactory<OnboardingDbContext>(options => options.UseSqlite("Data Source=onboarding.db"));Migrations
In order to have the application generate the necessary database structure automatically for us, we need to generate migration classes.
Run the following command to do so:
dotnet ef migrations add InitialApply Migrations
Run the following command to apply the migrations:
dotnet ef database updateThis will apply the migration and generate the Task table in the onboarding.db SQLite database.
Task List UI
Now that we have our database access layer setup, let's work on the UI to display a list of tasks. For that, we will first introduce a view model called
IndexViewModelfor theIndexaction of thehomeController:Views/Home/IndexViewModel.cs
HomeController
Update the
Indexaction of theHomeControllerto use the view model:Controllers/HomeController.cs
Index.cshtml
Update the Index.cshtml view to display the list of tasks:
Handling Task Completion
The
HomeControlleris able to list pending tasks. Now, let's add another action to it that can handle the event when a user clicks the Complete button.Add the following action method to
HomeController:The complete controller should look like this:
The above listing uses the
ElsaClientto report the task as completed, which we will create next.Elsa API Client
To interact with the Elsa Server's REST API, we will create an HTTP client called
ElsaClient.Create a new class called
ElsaClient:Services/ElsaClient.cs
Register ElsaClient
Update Program.cs to configure the Elsa HTTP client as follows:
Program.cs
var configuration = builder.Configuration; builder.Services.AddHttpClient<ElsaClient>(httpClient => { var url = configuration["Elsa:ServerUrl"]!.TrimEnd('/') + '/'; var apiKey = configuration["Elsa:ApiKey"]!; httpClient.BaseAddress = new Uri(url); httpClient.DefaultRequestHeaders.Authorization = new AuthenticationHeaderValue("ApiKey", apiKey); });appsettings.json
The Elsa configuration section used in the previous step is defined in appsettings.json as follows:
appsettings.json
{ "Elsa": { "ServerUrl": "https://localhost:5001/elsa/api", "ApiKey": "00000000-0000-0000-0000-000000000000" } }Receiving Webhooks
Now that we have a way to display the list of task, let's setup a webhook controller that can receive tasks from the workflow server.
Create a new controller called
WebhookController:Controllers/WebhookController.cs
The above listing uses the
WebhookEventmodel to deserialize the webhook payload. TheWebhookEventand related models are defined as follows:Models/WebhookEvent.cs
Running the Onboarding Process
Now that we have both the Elsa Server and Onboarding applications ready, let's try it out
Start Onboarding App
First, run the Onboarding project:
dotnet run --urls=https://localhost:5002Start Onboarding Workflow
To initiate a new execution of the Onboarding workflow, we will send an HTTP request to Elsa Server's REST API that can execute a workflow by its definition ID and receive input.
As input, we will send a small JSON payload that represents the new employee to onboard:
curl --location 'https://localhost:5001/elsa/api/workflow-definitions/{workflow_definition_id}/execute' \ --header 'Content-Type: application/json' \ --header 'Authorization: ApiKey 00000000-0000-0000-0000-000000000000' \ --data-raw '{ "input": { "Employee": { "Name": "Alice Smith", "Email": "alice.smith@acme.com" } } }'Make sure to replace {workflow_definition_id} with the actual workflow definition ID of the Onboarding workflow.
Start Onboarding Workflow
To initiate a new execution of the Onboarding workflow, we will send an HTTP request to Elsa Server's REST API that can execute a workflow by its definition ID and receive input.
As input, we will send a small JSON payload that represents the new employee to onboard:
curl --location 'https://localhost:5001/elsa/api/workflow-definitions/Onboarding/execute' \ --header 'Content-Type: application/json' \ --header 'Authorization: ApiKey 00000000-0000-0000-0000-000000000000' \ --data-raw '{ "input": { "Employee": { "Name": "Alice Smith", "Email": "alice.smith@acme.com" } } }'View Tasks
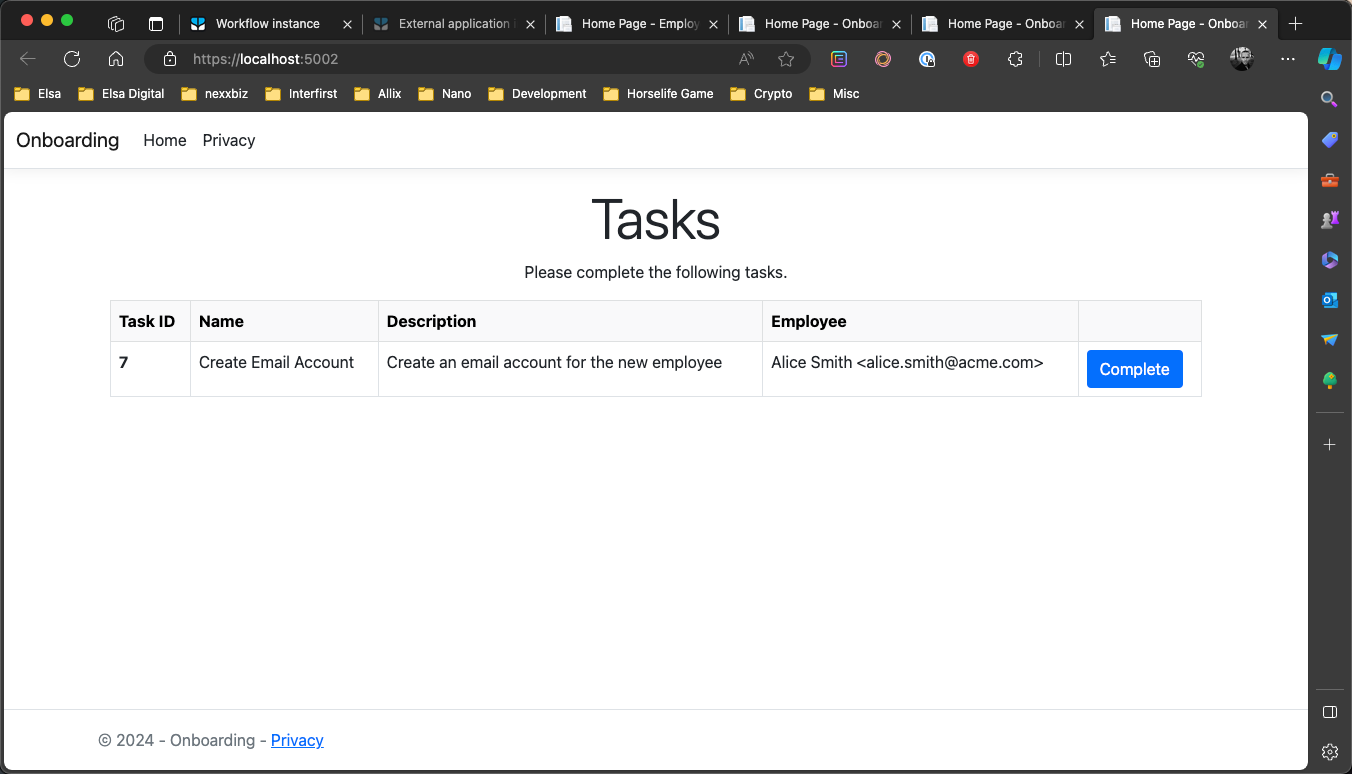
The effect of the above request is that a new task will be created in the database, which will be displayed in the web application:

Complete Task
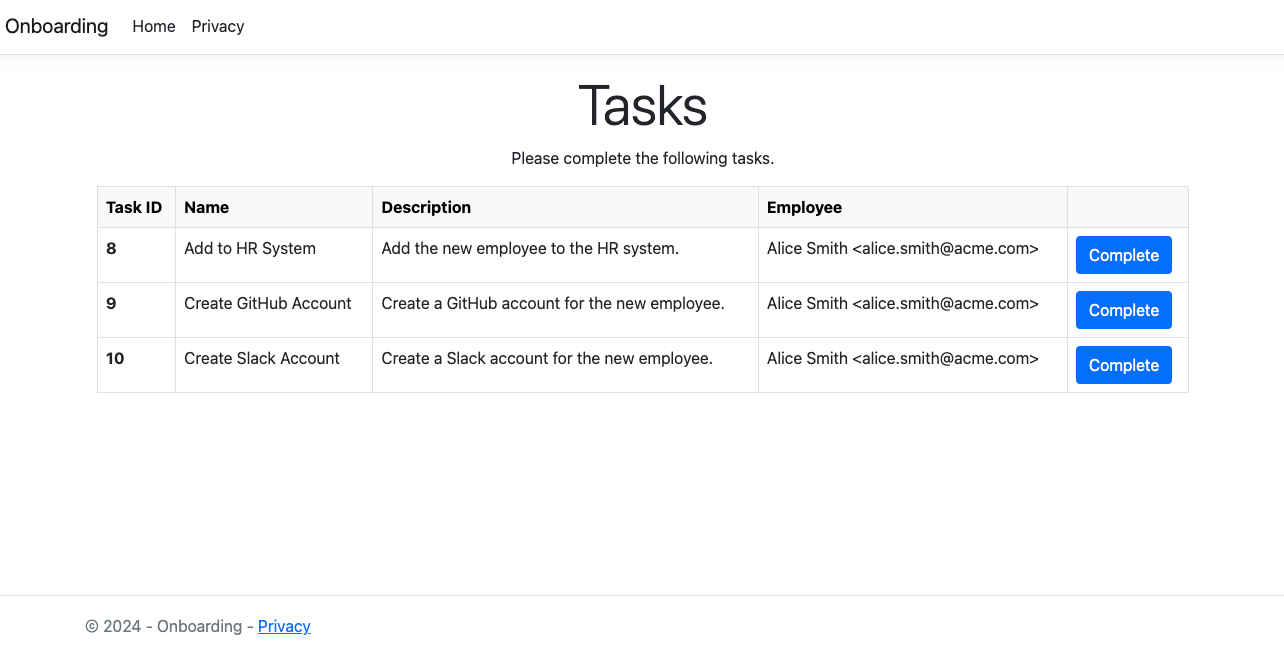
When you click the Complete button, the task will be marked as completed in the database and the workflow will continue. When you refresh the Task list page, the task will be gone, but 3 new tasks will be created in the database:

End
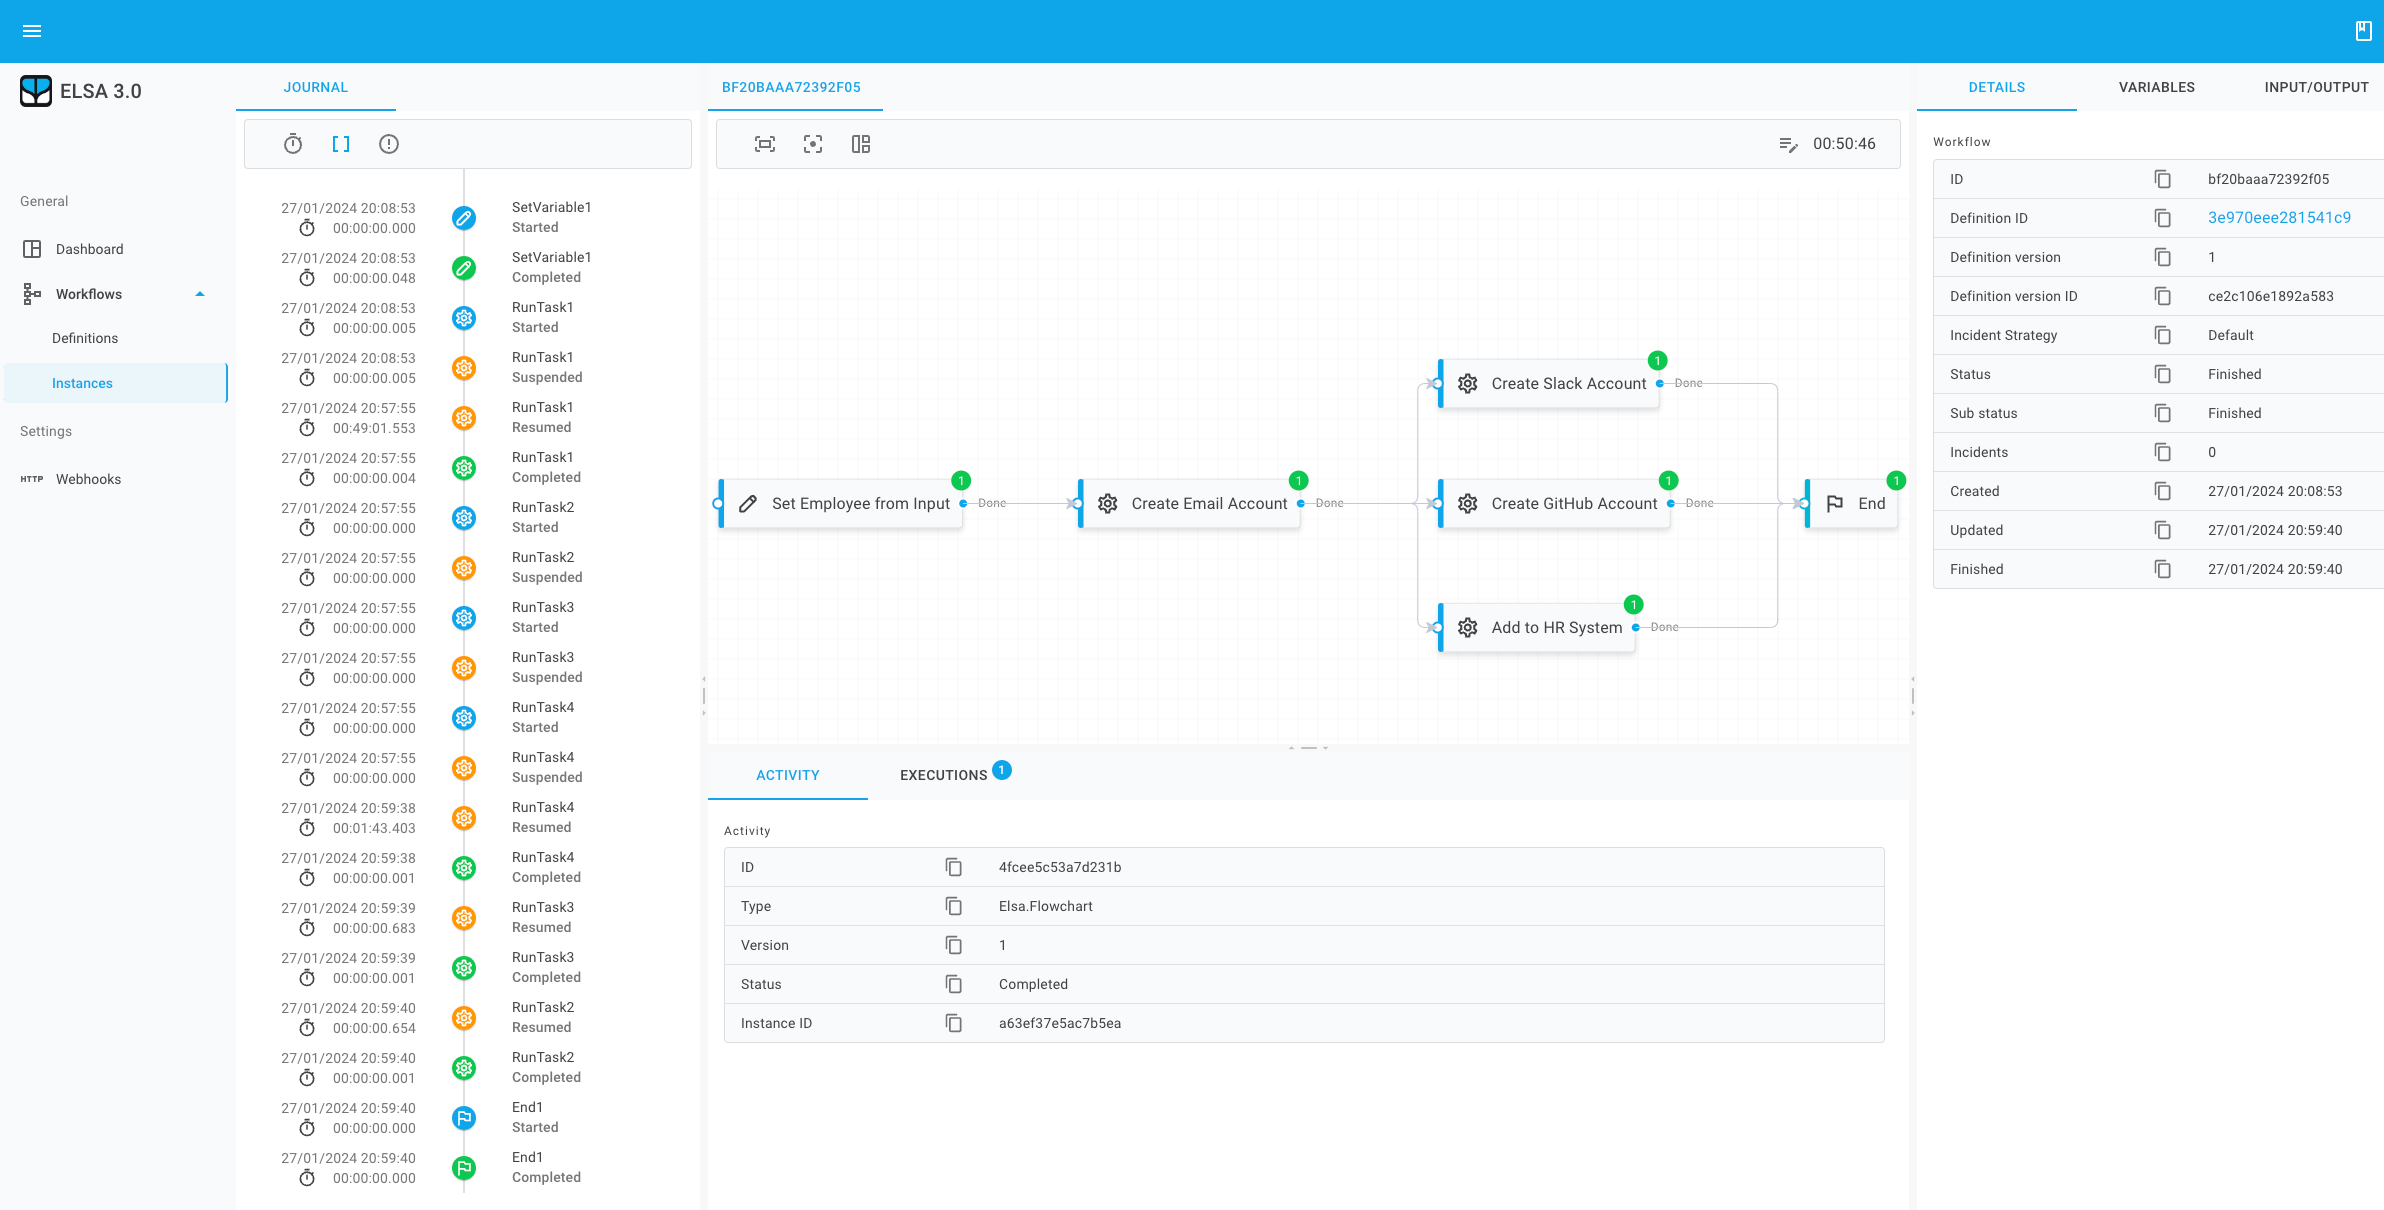
Once you complete all tasks, the workflow will be completed:

Summary
In this guide, we have seen how to set up an Elsa Server project and configure it to send webhook events to the Onboarding application.
We have seen how to leverage the Run Task activity that generates Run Task webhook events.
From the Onboarding app, we leveraged an Elsa REST API to report a given task as completed, which causes the workflow to resume,
Source Code
The completed code for this guide can be found here.
