Dispatching Child Workflows
When building workflows, you might want to reuse existing workflows as part of a larger workflow.
In Elsa, you can reuse workflows by dispatching them from other workflows. This is done using the Dispatch Workflow activity.
Dispatching a workflow
To dispatch a workflow, you need to add a Dispatch Workflow activity to your workflow. This activity has a property that you can use to specify the definition ID of the workflow you want to dispatch.
When the DispatchWorkflow activity executes, it dispatches the selected workflow. The dispatched workflow will run in the background and the parent workflow will continue executing, unless the property is set to true.
Trying it out
First, we will create a child workflow and then a parent workflow that will dispatch said child workflow for execution.
Create Child Workflow
Create a new workflow called Child Workflow.
Add a new WriteLine activity to the design surface.
Configure the WriteLine activity's Text property with the text
Hello from Child.Publish the workflow.
The result should look like this:
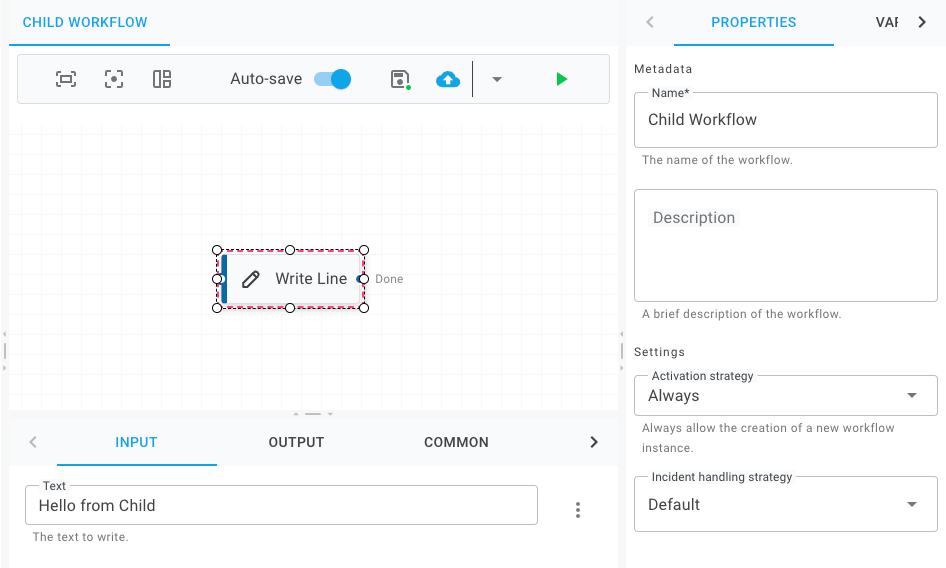
Create Child Workflow
Create a new workflow class called
ChildWorkflowusing the following code:Workflows/ChildWorkflow.cs
using Elsa.Workflows; using Elsa.Workflows.Activities; using Elsa.Workflows.Contracts; using JetBrains.Annotations; namespace ElsaServer.Workflows; [UsedImplicitly] public class ChildWorkflow : WorkflowBase { protected override void Build(IWorkflowBuilder builder) { builder.Name = "Child Workflow"; builder.Root = new WriteLine("Hello from Child"); } }
Create Parent Workflow
Create a new workflow called Parent Workflow.
Add a new WriteLine activity to the design surface.
Configure the WriteLine activity's Text property with the text
Parent started.Add a new Dispatch Workflow activity with the following settings:
Name
Value
Workflow Definition
Child Workflow
Wait For Completion
true
Add another WriteLine activity to the design surface and configure its Text property with the text
Parent completed.Publish the workflow.
The result should look like this:
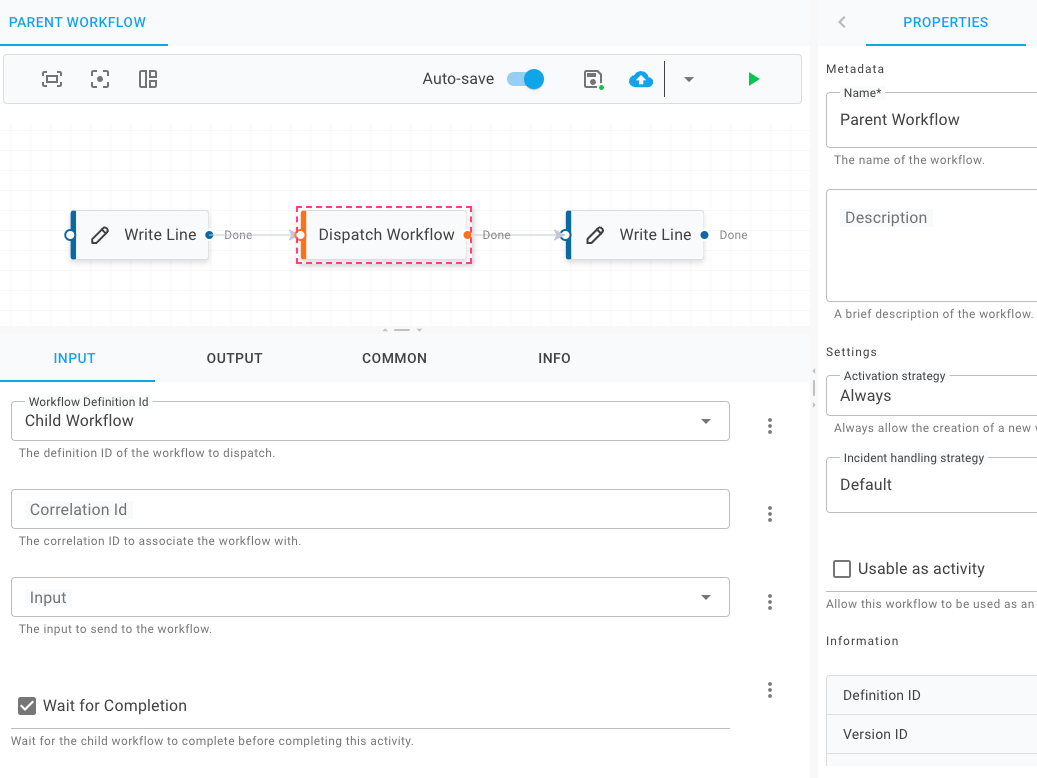
Create Parent Workflow
Create a new class called
ParentWorkflowusing the following code:Workflows/ParentWorkflow.cs
using Elsa.Workflows; using Elsa.Workflows.Activities; using Elsa.Workflows.Contracts; using Elsa.Workflows.Runtime.Activities; using JetBrains.Annotations; namespace ElsaServer.Workflows; [UsedImplicitly] public class ParentWorkflow : WorkflowBase { protected override void Build(IWorkflowBuilder builder) { builder.Name = "Parent Workflow"; builder.Root = new Sequence { Activities = { new WriteLine("Parent started"), new DispatchWorkflow { WorkflowDefinitionId = new("ChildWorkflow"), WaitForCompletion = new(true) }, new WriteLine("Parent completed") } }; } }
Running the Parent Workflow
Make sure the Elsa Server app is running.
From Elsa Studio, open the Parent Workflow and click on the button.
From the left menu, select the menu item and notice that two workflow instances have been created:
Parent Workflow
Child Workflow
Passing Input
You can pass input to the dispatched workflow. To do this, you need to set the property to a JSON object that contains the input you want to pass to the workflow.
When the workflow is executed, the Dispatch Workflow activity will dispatch the workflow with the specified input.
Trying it out
Let's see how we can pass input from the parent workflow to the child workflow using the Dispatch Workflow activity.
Update Child Workflow
Open Child Workflow in Elsa Studio.
From the tab, add a new Input called
Messageof typeString.Update the WriteLine activity's Text property with a dynamic expression:
getMessage()return Inputs.Message;input.get("Message"){{ Input.Message }}Publish the changes.
Update Child Workflow
Update the
ChildWorkflowclass as follows:Workflows/ChildWorkflow.cs
using Elsa.Workflows; using Elsa.Workflows.Activities; using Elsa.Workflows.Contracts; using Elsa.Workflows.Models; using JetBrains.Annotations; namespace ElsaServer.Workflows; [UsedImplicitly] public class ChildWorkflow : WorkflowBase { protected override void Build(IWorkflowBuilder builder) { builder.Name = "Child Workflow"; builder.Inputs.Add(new InputDefinition { Name = "Message", DisplayName = "Message", Description = "The message to write to the console.", Type = typeof(string) }); builder.Root = new WriteLine("Hello from Child"); } }
Update Parent Workflow
Open Parent Workflow in Elsa Studio.
Update the Dispatch Workflow activity's Input property with a dynamic expression:
return { Message: "Hello from Parent" }return new { Message = "Hello from Parent" };{ "Input": "Hello from Parent" }Publish the workflow.
Update Parent Workflow
Update the
ParentWorkflowas follows:Workflows/ParentWorkflow.cs
using Elsa.Workflows; using Elsa.Workflows.Activities; using Elsa.Workflows.Contracts; using Elsa.Workflows.Runtime.Activities; using JetBrains.Annotations; namespace ElsaServer.Workflows; [UsedImplicitly] public class ParentWorkflow : WorkflowBase { protected override void Build(IWorkflowBuilder builder) { builder.Name = "Parent Workflow"; builder.Root = new Sequence { Activities = { new WriteLine("Parent started"), new DispatchWorkflow { WorkflowDefinitionId = new("ChildWorkflow"), WaitForCompletion = new(true), Input = new(_ => new Dictionary<string, object> { ["Message"] = "Hello from Parent" }) }, new WriteLine("Parent completed") } }; } }
Running the Parent Workflow
Make sure the Elsa Server app is running.
From Elsa Studio, open the Parent Workflow and click on the button.
Keep an eye out on the console to witness the changed output.
Receiving Output
You can also receive output from the dispatched workflow. To do this, you need to set the property to true and set the property to a workflow variable of type Object or ObjectDictionary that contains the output you want to receive from the workflow.
You can also receive output from the dispatched workflow. To do this, you need to set the WaitForCompletion property to true and assign a workflow variable to the Output property of type IDictionary<string, object>.
Trying it Out
In this example, we will see how to update the child workflow to produce an output, that is then captured by the parent workflow's Dispatch Workflow activity.
Update Child Workflow
Open Child Workflow in Elsa Studio.
Add a new Output Definition called Response of type String
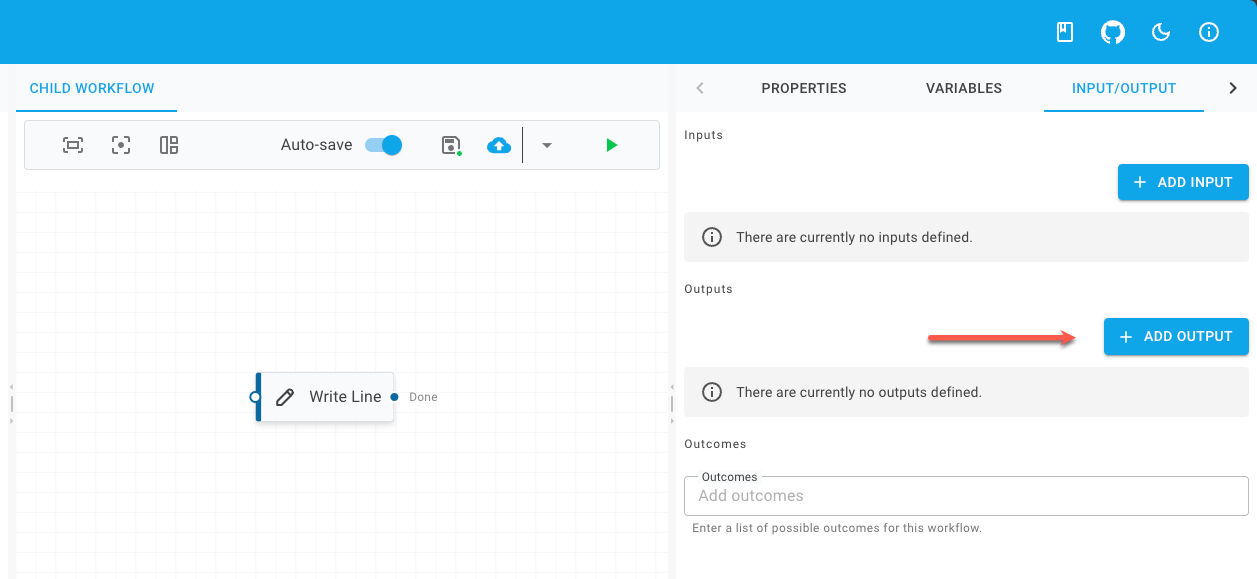
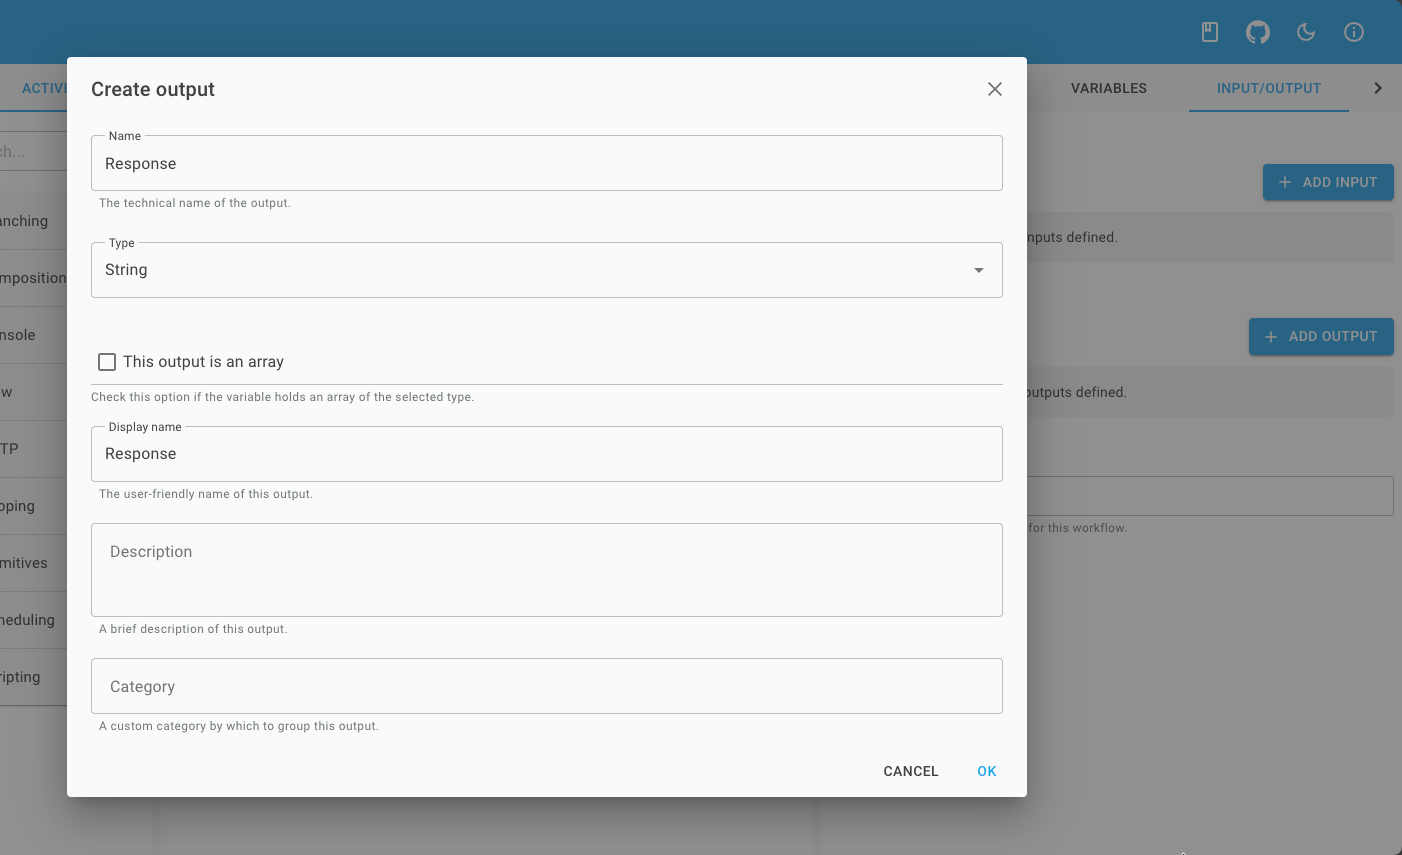
Add a new Set Output activity to the workflow and configure it as follows
Property
Value
Output
ResponseValue
Hello from ChildMake sure that you connect the Write Line activity to the Set Output activity.
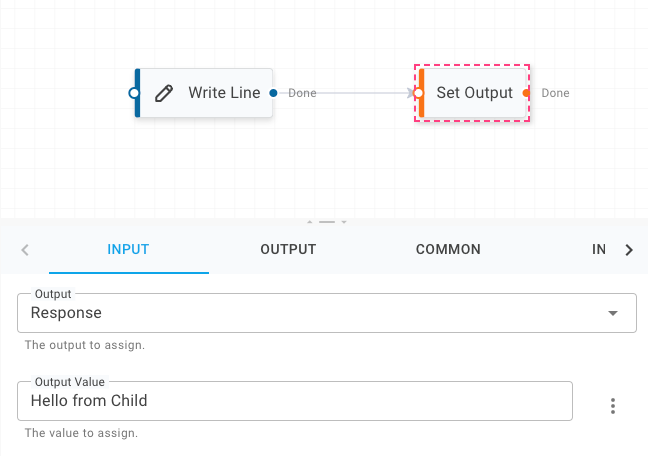
Publish the workflow.
Update Child Workflow
Update the
ChildWorkflowclass as follows:Workflows/ChildWorkflow.cs
using Elsa.Extensions; using Elsa.Workflows; using Elsa.Workflows.Activities; using Elsa.Workflows.Contracts; using Elsa.Workflows.Management.Activities.SetOutput; using Elsa.Workflows.Models; using JetBrains.Annotations; namespace ElsaServer.Workflows; [UsedImplicitly] public class ChildWorkflow : WorkflowBase { protected override void Build(IWorkflowBuilder builder) { var messageInput = new InputDefinition { Name = "Message", DisplayName = "Message", Description = "The message to write to the console.", Type = typeof(string) }; var messageOutput = new OutputDefinition { Name = "Response", DisplayName = "Response", Description = "The message to provide as output.", Type = typeof(string) }; builder.Name = "Child Workflow"; builder.Inputs.Add(messageInput); builder.Outputs.Add(messageOutput); builder.Root = new Sequence { Activities = { new WriteLine(context => context.GetInput<string>("Message")), new SetOutput { OutputName = new(messageOutput.Name), OutputValue = new("Hello from Child") } } }; } }
Now that the child workflow produces an output, let's update the parent workflow to capture this output.
Update Parent Workflow
Open Parent Workflow in Elsa Studio
Add a new workflow variable called ChildOutput of type
ObjectDictionary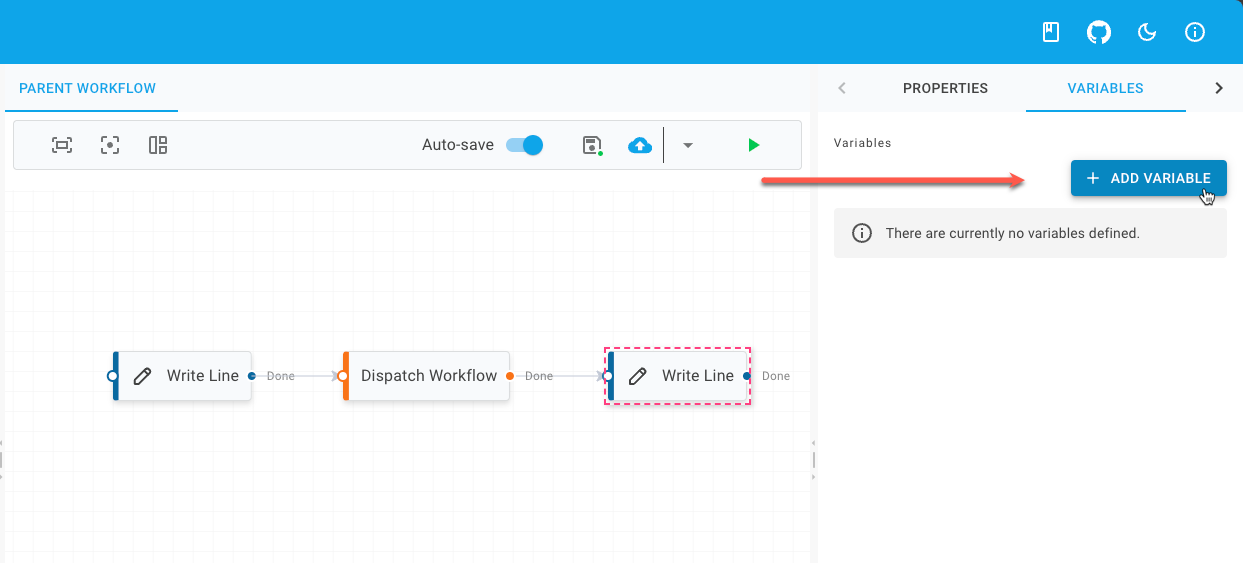
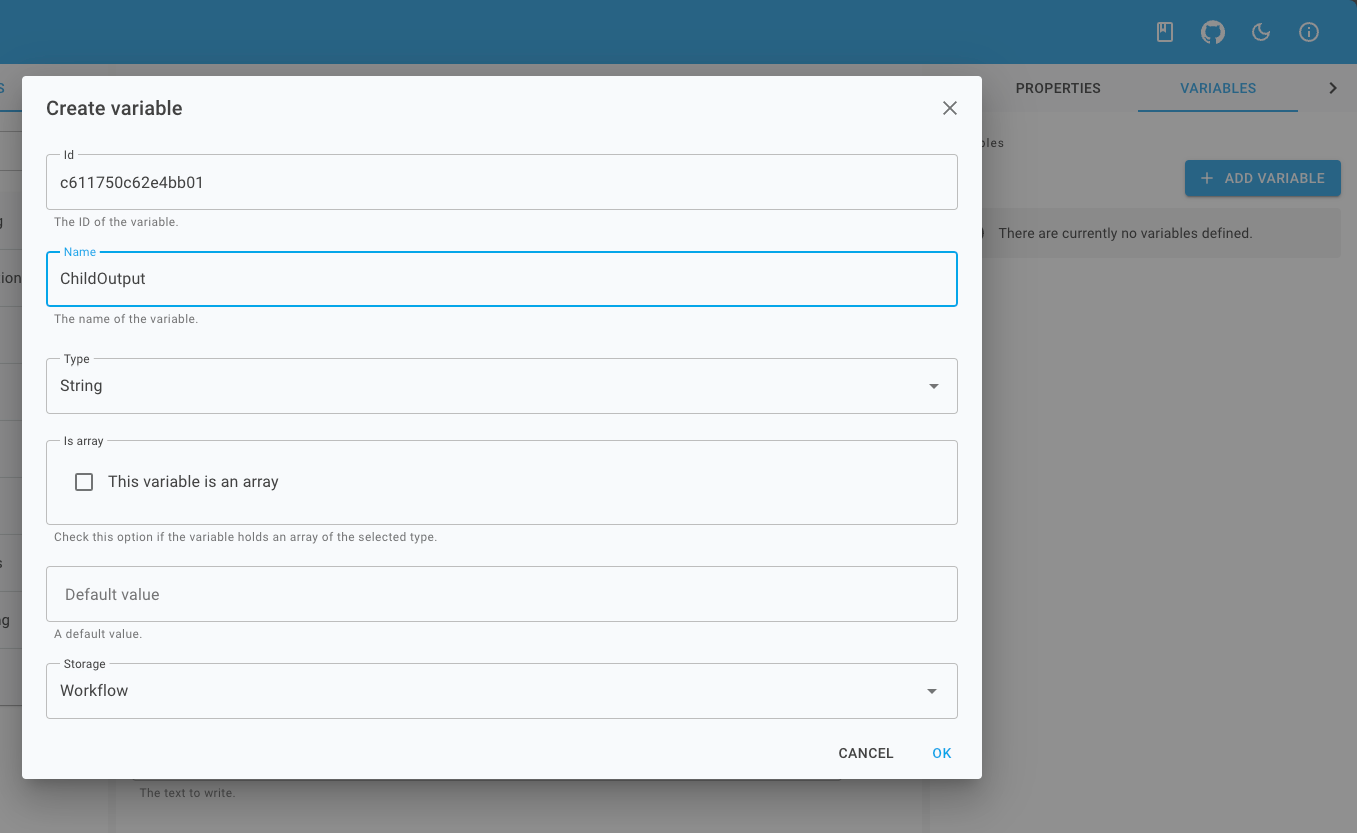
Select the Dispatch Workflow activity and select its tab
From this tab, you will see the Result property that is displayed as a dropdown list.
From this list, select the
ChildOutputvariable that we created in the previous step.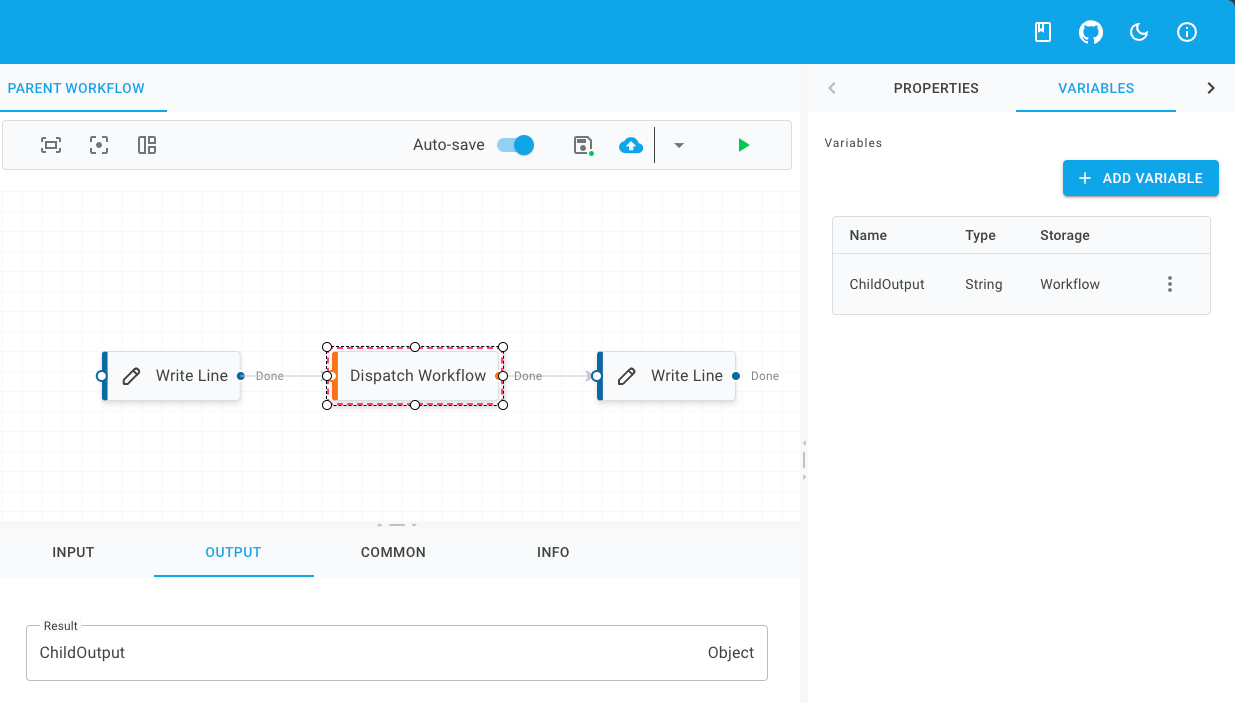
Select the existing Write Line activity and update its property with one of the following:
return Variables.ChildOutput["Response"];getChildOutput().Responsevariables.ChildOutput.Response{{ Variables.ChildOutput["Response"] }}Publish the workflow
Update Parent Workflow
Update the
ParentWorkflowclass as follows:Workflows/ParentWorkflow.cs
using Elsa.Workflows; using Elsa.Workflows.Activities; using Elsa.Workflows.Contracts; using Elsa.Workflows.Runtime.Activities; using JetBrains.Annotations; namespace ElsaServer.Workflows; [UsedImplicitly] public class ParentWorkflow : WorkflowBase { protected override void Build(IWorkflowBuilder builder) { var childOutput = builder.WithVariable<IDictionary<string, object>>(); builder.Name = "Parent Workflow"; builder.Root = new Sequence { Activities = { new WriteLine("Parent started"), new DispatchWorkflow { WorkflowDefinitionId = new("ChildWorkflow"), WaitForCompletion = new(true), Input = new(_ => new Dictionary<string, object> { ["Message"] = "Hello from Parent" }), Result = new(childOutput) }, new WriteLine(context => (string)childOutput.Get<IDictionary<string, object>>(context)!["Response"]) } }; } }
Running the Parent Workflow
From the Parent Workflow open in the editor, click on the button.
From the left menu, select the menu item and notice that two workflow instances have been created:

Inspect the Child Workflow instance to observe that it produced an output.
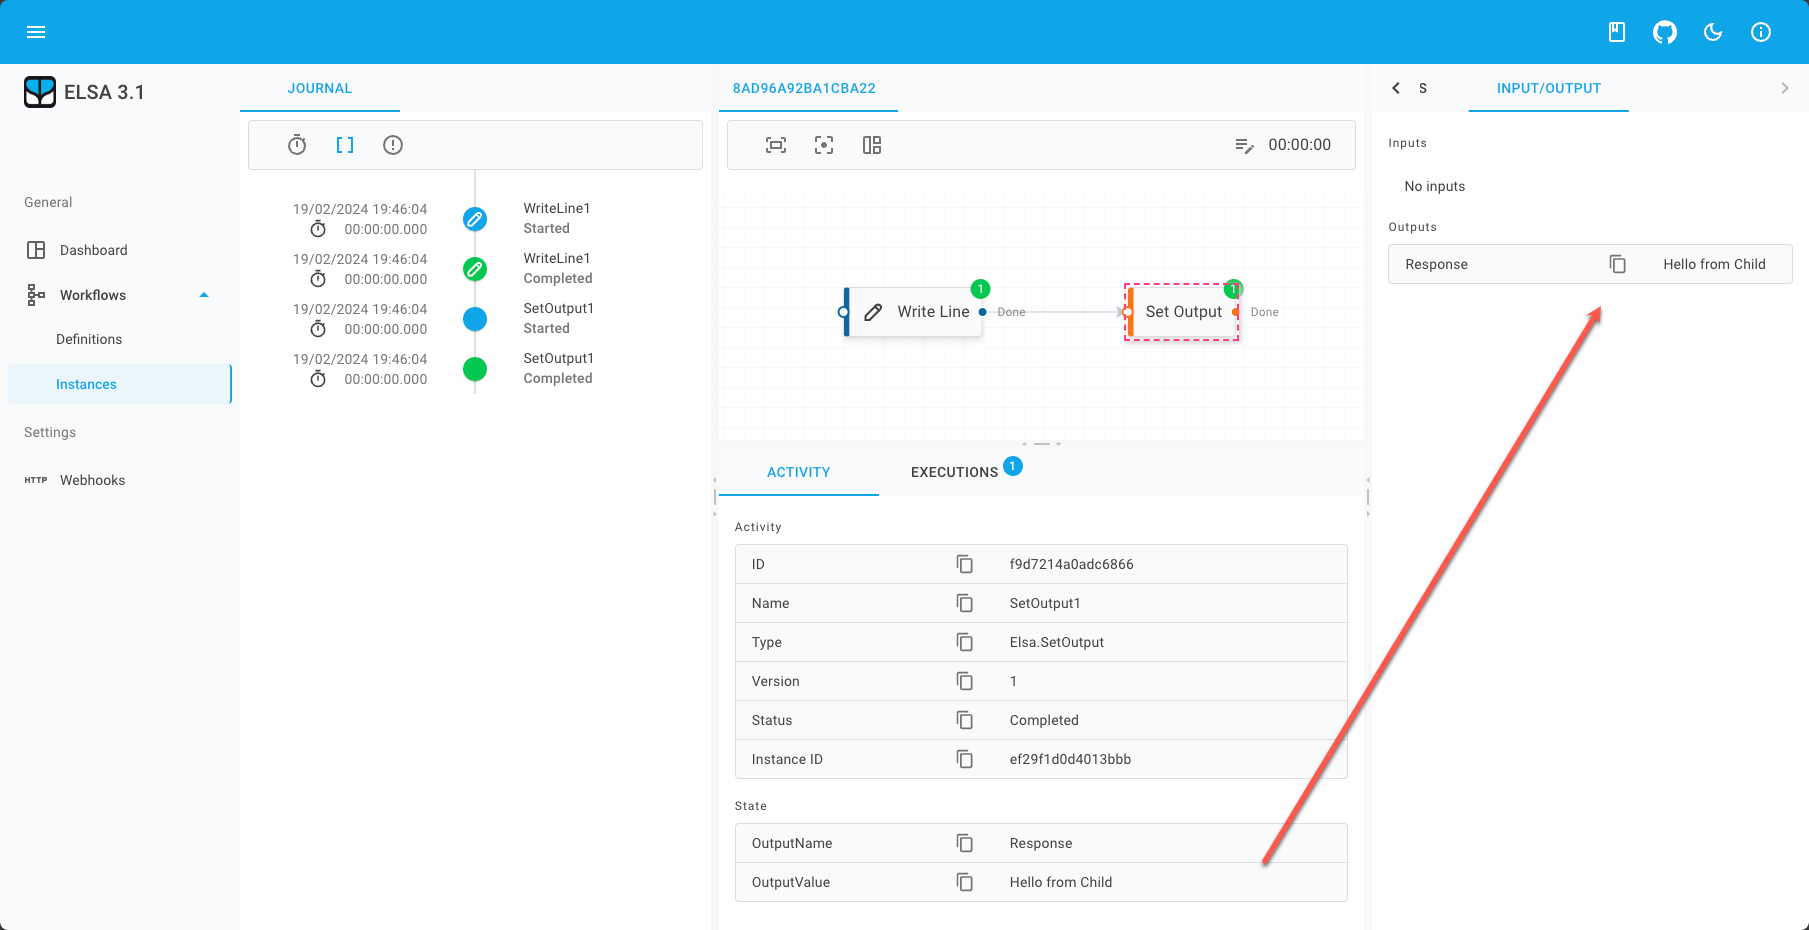
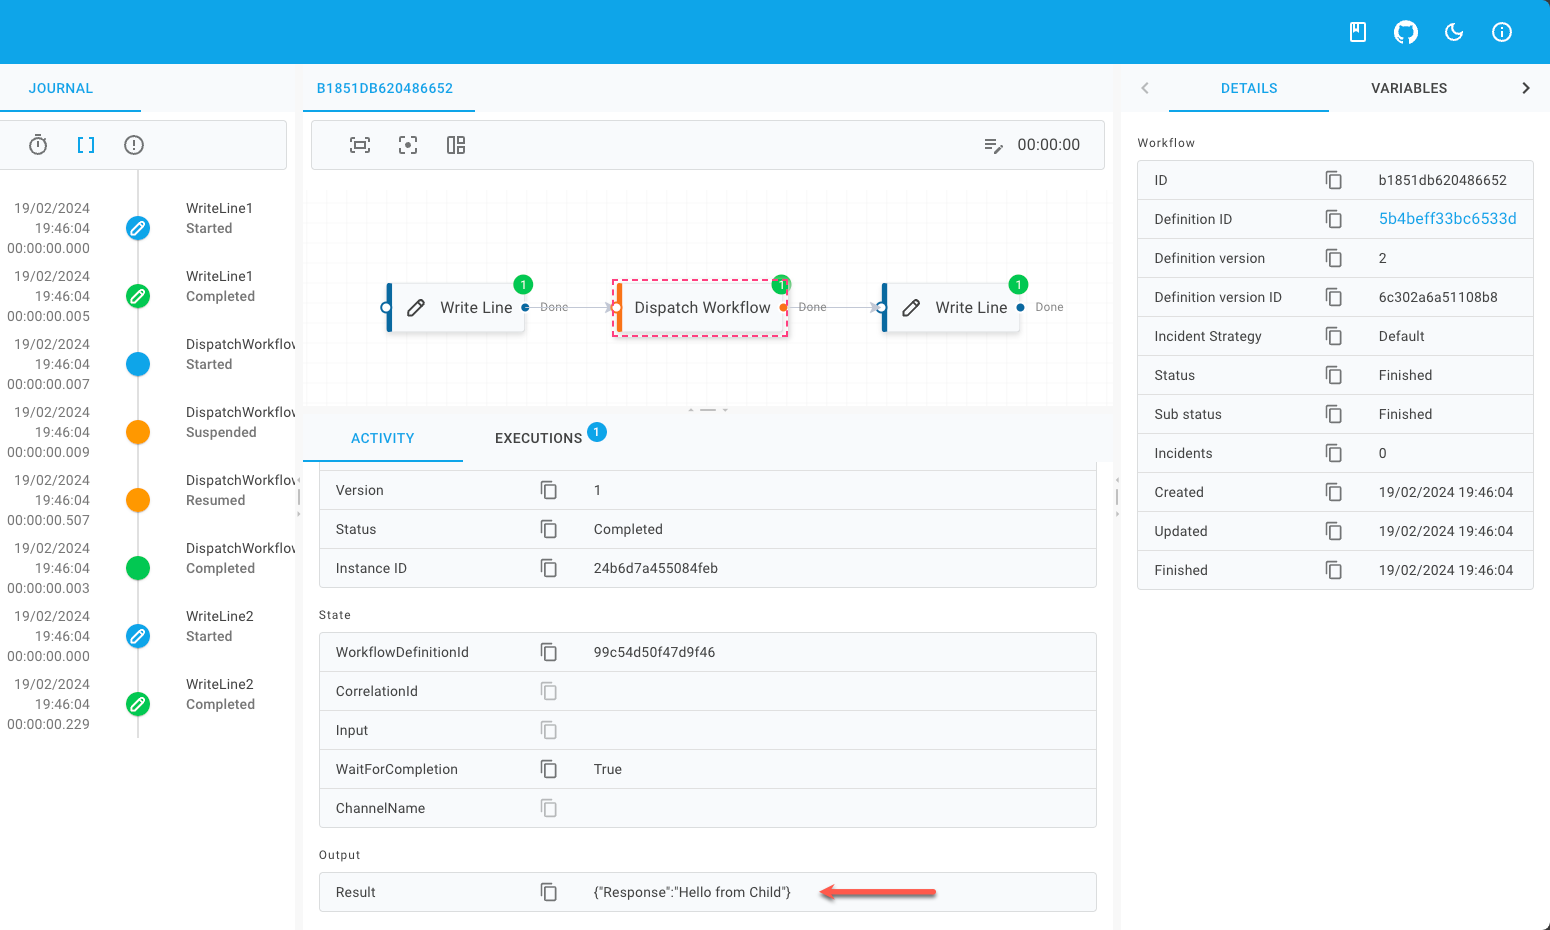
Inspect the Parent Workflow instance to observe that its Dispatch Workflow activity received the output from the dispatched Child workflow.
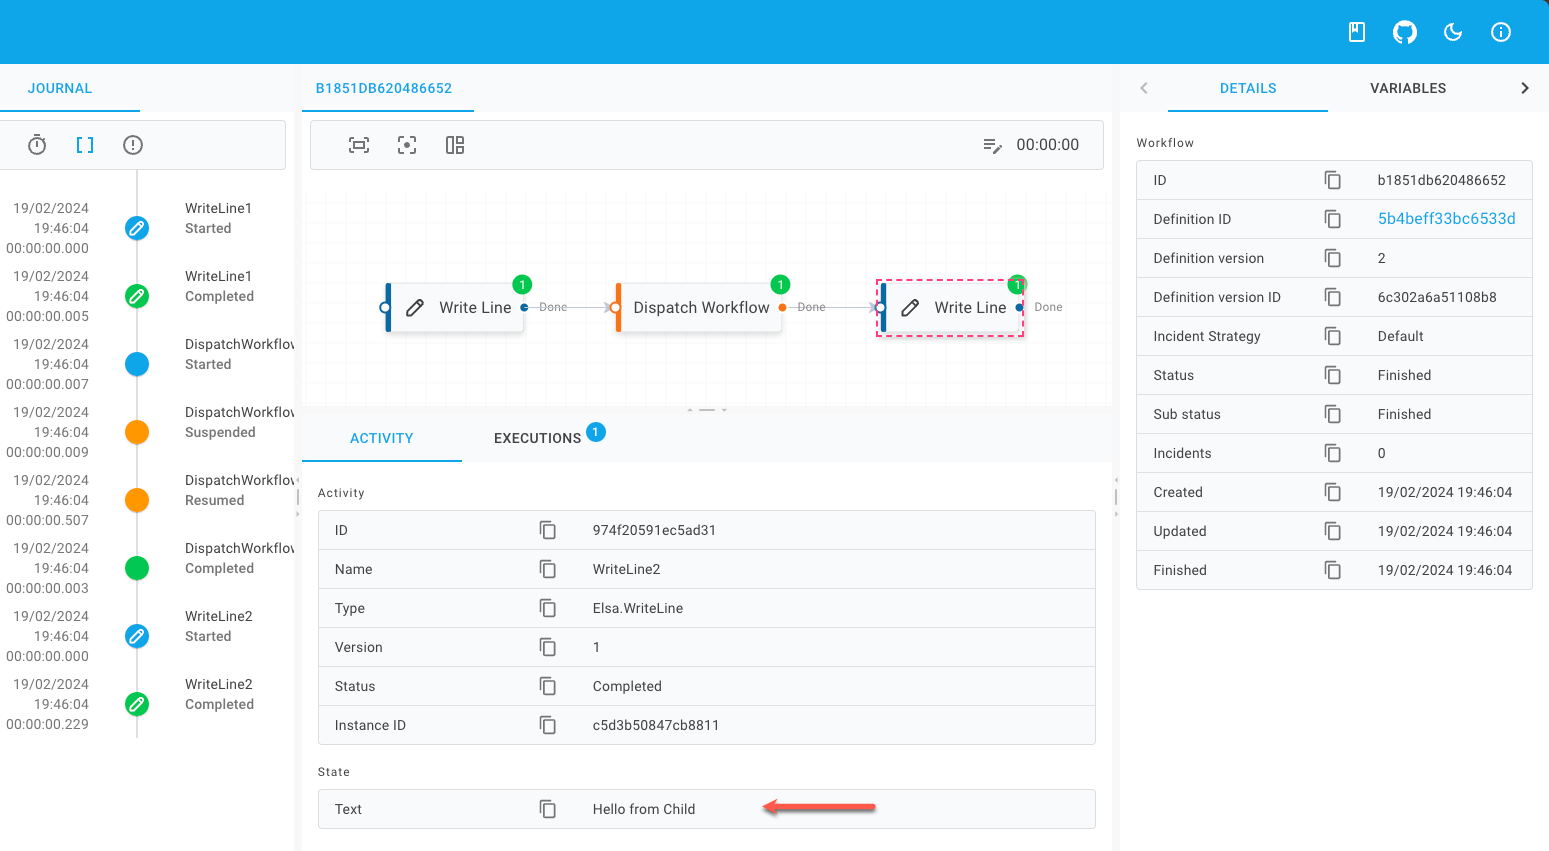
Also observe that the Write Line activity printed the expected result.
Summary
In this guide, we have seen how to dispatch child workflows using the Dispatch Workflow activity.
We have seen how to send input to and receive output from the child workflow.
Source Code
The completed code for this guide can be found here.